Introduction to Board Game Card Design
Designing board game cards is both an art and a science. It is where creativity meets functionality. Your cards are the heart of your board game. They hold the key to the game’s theme, mechanics, and player interaction. A well-designed card can make a game compelling and memorable. To start, you’ll need to understand the basics of card design. This involves developing a concept that aligns with your game’s theme. You’ll decide on the layout, imagery, and text for your cards. Each element must be clear and serve the overall gameplay.Discover how to design and customize board game card template! Explore types of templates, design tips, and resources for your game.
In this blog, we’ll walk you through a step-by-step guide to create your own board game cards. From sketching out ideas to the final production, we’ll cover every step. For those new to game design, don’t worry. We’ll keep things simple. We’ll avoid complex jargon, focusing on providing practical advice. You’ll learn about the essential tools and materials needed in this journey. We’ll explore techniques for writing card text that is easy to understand. You’ll also learn to prototype and playtest your cards. Finally, we’ll discuss card stock selection and the printing process. Let’s get started on this exciting path to creating your very own board game card template.
Essential Tools and Materials for Card Creation
To create your board game card template, having the right tools and materials is crucial. Let’s break down what you’ll need to get started on your card-making journey. First, ensure you have a quality computer with graphic design software. Programs like Adobe Illustrator or Photoshop are ideal for design and layout work. They let you create, edit, and finalize your card visuals. A reliable printer comes next. It doesn’t have to be professional-grade, but it should produce clear, vibrant prints. This is vital for prototyping. Thirdly, card stock is a must for physical prototypes. Choose a medium to heavy weight that feels good in hand, like 300gsm (grams per square meter) paper. Lastly, consider precise cutting tools like a paper cutter or scissors. They’ll help you trim your cards to the exact size.
Don’t forget a ruler for measuring and marking. Additional accessories may include pencils, erasers, and sketching paper for pre-design work. Markers or colored pencils are useful for hand-drawing elements. If you are on a budget, online tools offer card design templates and free software alternatives. These can be a great starting point. They help you visualize your ideas without a heavy investment. Remember, high-quality materials contribute to a better end product. So weigh your options carefully and select materials that will bring your vision to life. Keep in mind, the keyword ‘board game card template’ is not merely a design, but also the materials and tools that make it palpable.
Step 1: Conceptualizing Your Game’s Theme and Mechanics
Before diving into the visual aspect of your board game card template, the foundational step is conceptualizing your game’s theme and mechanics. This forms the blueprint for your game and directly influences card design. To begin, think deeply about the game’s theme. Is it fantasy, sci-fi, or perhaps historical? The theme will shape the card’s aesthetics, iconography, and narrative elements. Then, delve into the mechanics. These are the rules and systems that govern gameplay.
Decide how cards will function within these rules. Will they be for drawing, trading, or accumulating points? Perhaps they’ll dictate player movement or actions. It’s important that the mechanics match the theme. They must provide players with a coherent and engaging experience. Jot down your ideas. This makes it easier to refine them and integrate them into your board game card template. Combining a strong theme with solid mechanics is key to your game’s success. Remember, the most memorable games offer a seamless blend of theme and mechanics, ensuring players are immersed and invested from the start.
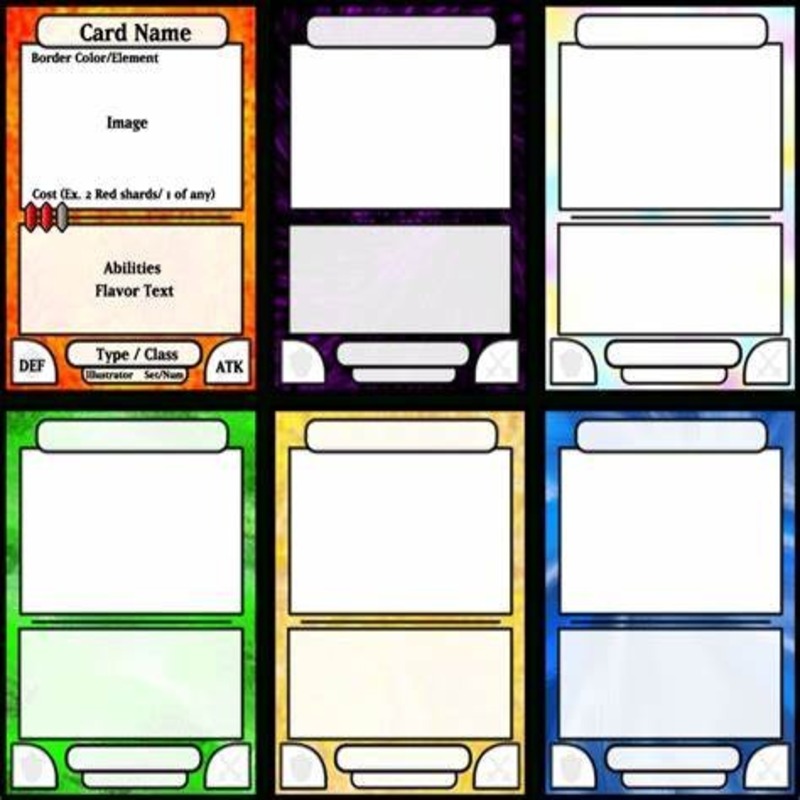
Step 2: Designing the Layout and Artwork for Your Cards
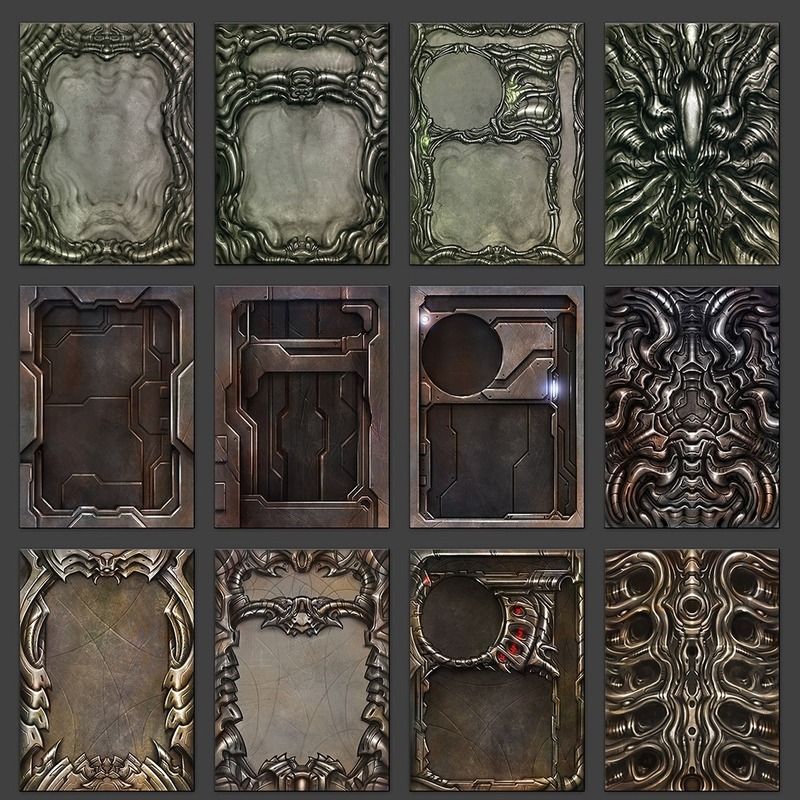
Once your game’s theme and mechanics are pinned down, it’s time to design the layout and artwork for your cards. This creative phase lets your board game card template come to life. Start with a card layout. This determines how elements like text, images, and icons fit together. Balance is key. Make sure information is easy to read and well-spaced. Choose a layout that complements the game mechanics.
For artwork, aim for a style that reflects your theme. Consider elements that players connect with. Art can be detailed or simple. Even stick figures can charm players if done right. Originality stands out. Try to craft visuals that players haven’t seen before.
Use colors to guide players. Colors can show card types or actions. They help players understand the game quickly. Repeat important symbols or designs across cards for consistency. This familiarity helps players learn your game faster.
Your board game card template needs clear, readable fonts. Pick a size that’s easy on the eyes. Font style should match the theme. A fantasy game might use a more decorative font, while a modern-themed game might have a sleek, clean typeface.
Remember to leave some blank space, called ‘bleed,’ around the edges of your cards. This ensures that during the cutting process, no important design elements are lost.
Designing cards is exciting. But keep usability in mind. Cards should look good and be functional. With each design choice, ask if it helps or hinders player understanding.
Before moving on to the next step, scrutinize each aspect of your template. Seek feedback from friends or gamers who can offer fresh perspectives. Making changes now is easier than post-production. Get these details right, and your cards will shine during gameplay.
Step 3: Writing Clear and Concise Card Text
After setting the visual stage for your board game card template, writing clear and concise text is your next task. The words on your cards are crucial. They instruct, inform, and engage players. Long, complex sentences can confuse and bore them. Let’s focus on creating text that’s easy to follow.
Start with the card’s title. Make it catchy yet relevant to the card’s function. A good title sets the tone and hints at the card’s role in the game. Next, focus on the description or instruction text. Keep it brief. Use simple, active voice sentences. They are easier to read and understand quickly.
Use bullet points for lists of actions or conditions. This helps players scan the card and grasp the gameplay. Avoid jargon unless it is explained elsewhere in the game. Common terms that everyone understands are best.
For flavor text that adds to the game’s story, be succinct. A single, evocative sentence can do more than a paragraph. Balance clarity with creativity. Remember, clear text improves the player’s experience and keeps the game moving.
Consider readability in your font choices. Stick to fonts that are uncluttered and large enough to read at a glance. Color contrast between text and background is important too. Ensure there’s enough distinction to read easily in various lighting.
Finally, proofread your text. Typos or grammatical errors can mar your board game card template. Ask others to review your cards. Fresh eyes often catch mistakes that you might overlook. Clear, error-free text will make your card game professional and polished.
By adhering to these guidelines, your card text will be an asset to your game, enhancing playability and enjoyment.
Step 4: Prototyping Your Cards for Playtesting
After crafting your board game card template text and design, prototyping is next. Prototyping helps test and refine your cards. For this step, focus on creating a playable version of your cards. You don’t need a perfect look yet, just functionality.
Start by printing a rough version of your cards using your home printer. The goal is to get a feel for the cards in a game setting. Use card stock for durability. Cut the cards out carefully with scissors or a paper cutter. Remember, accuracy counts.
Now, it’s time for playtesting. Gather a group of testers. Look for diverse players who can simulate different gaming experiences. Watch them play. See how they interact with your cards. Note any confusion or questions about the card’s use.
Keep a record of feedback. Focus on how the text, design, and mechanics come together. Do they work as intended? Are there parts that players don’t understand? Use this info to make your game better.
Revise your board game card template as needed. Redo layouts, tweak text, or adjust the design. Each prototype round should bring your game closer to perfection. Repeat the process until your cards are clear, engaging, and fun.
Prototyping is an ongoing process. Aim for simplicity and ease of use. Update your cards regularly based on playtest results. Your game will improve bit by bit. Prototyping is vital to create an enjoyable and smooth board game experience.
Step 5: Selecting the Right Card Stock and Finishing Options
Selecting the ideal card stock for your board game card template is a crucial step. It impacts how your cards feel, last, and are handled by players. Start with choosing the weight of the card stock. Heavier stock feels more durable and high-quality. A common choice is 300-350gsm, offering a balance between firmness and flexibility.
Consider the texture too. Smooth finishes work well for modern designs. A linen or textured finish adds a tactile element, often favored in games with a vintage or classic vibe. Think about the theme of your game when making this decision.
Finishing options are just as important. A gloss finish can make colors pop and is easy to clean. However, it can cause glare under bright lights. A matte finish reduces glare and gives a more sophisticated look, but might not be as vibrant. Some designers opt for a UV coating for added durability, as it protects against scratches and moisture.
Do you plan to write on the cards? If so, a writable finish is necessary. Test different samples with the pens or markers you intend to use. Make sure the ink adheres well and doesn’t smudge.
Lastly, consider the environmental impact of your choices. Recycled card stock options are available and can attract eco-conscious players. Plus, they show that your brand values sustainability.
Always order samples before making a final decision. This allows you to feel the material and see the print quality. It ensures that your choice fits your board game card template perfectly. Choosing the right card stock and finishes elevates the player’s experience and enhances your game’s appeal.
Step 6: Printing and Production Best Practices
When your board game card template is ready, printing and production are your next steps. To ensure quality results, follow these best practices. First, choose a reputable printer. Look for reviews or ask other game designers for recommendations. A reliable printer will produce consistent colors and sharp images on every card.
Check the file formats your printer requires. Most ask for PDF or TIFF files in high resolution. This ensures that your designs look as intended when printed. Before sending the files, double-check all your designs for errors. Make sure your bleed areas and margins are correct.
Ask for a proof before full production. A proof is a sample run of your cards. It lets you check for color accuracy and print quality. If there’s an issue, it’s easier to fix before the full run.
Consider the turnaround time for your print job. This is how long it takes to print and ship your cards. Plan for extra time before your game’s release. This avoids last-minute stress.
Discuss packaging options with your printer. Good packaging protects your cards and can also enhance your game’s appeal. Look for durable and attractive options.
Finally, order a small batch first if possible. This lets you review the final product without committing to a large quantity. If changes are needed, you can make them before the main production.
By following these printing and production tips, your board game card template will turn into a high-quality component of your game. This stage is critical to presenting a professional and polished final product to your players.
Legal Considerations: Copyrights and Trademarks
When creating a board game card template, legal matters can’t be overlooked. Copyrights protect the original artwork and text you create. They prevent others from using them without permission. Trademarks guard logos and game names. Make sure your creations are not infringing on existing copyrights or trademarks. Research is key here to avoid any legal issues.
Understanding Copyrights
Copyrights automatically apply to creative works when you make them. They protect your game’s artwork, design, and text. Ensure everything you create is original. Using others’ works could lead to legal trouble. Always ask for and document permission if you use someone else’s content.
Trademarks protect brand names, slogans, and logos. If you have a unique game name or logo, consider registering it. This makes it legally yours and helps avoid conflicts. Use searches to check if your game’s name or symbols clash with existing trademarks.
Seeking Legal Advice
It’s wise to seek advice from a legal expert in the gaming industry. They can help navigate these complex areas. They ensure that your board game card template respects all legal boundaries. This step protects your work and keeps the play fair for everyone.
Final Thoughts: Tips for Success in Card Game Creation
After following the previous steps, your board game card template is nearing completion. To wrap things up, let’s focus on some final tips to ensure success in your card game creation journey.
Keep your audience in mind throughout the design process. The preferences and feedback of players are invaluable. They shape your game’s appeal and playability. Continuous playtesting with your target audience will reveal what works and what needs improvement.
Stay organized. Keep all your design files, drafts, and notes in order. This makes it easy to revise and share your work with others. A well-organized design process saves time and reduces errors.
Embrace simplicity. Complex mechanics or designs can overwhelm players. Aim for a balance between challenge and enjoyment. Simple rules and designs often lead to the most engaging games.
Protect your work. Copyrights and trademarks are crucial. Document your creative process and register your unique elements. This safeguards against plagiarism and protects your intellectual property.
Stay up to date with industry trends. Player preferences evolve. Market trends shift. Keep tabs on what’s current in the gaming world to ensure your game remains relevant.
Remember that quality matters. From the card stock you choose to the box that holds your game. Every detail contributes to the player’s experience. Invest in quality materials and a professional look.
Finally, don’t be afraid to seek help. Collaborations can bring new insights and skills to your project. Connections with other designers and professionals can enhance the quality of your game.
By keeping these tips in mind, your dedication and hard work will surely result in a board game card template that provides an enjoyable and memorable experience for players.